Debugging within a PHP Docker Container using IDEA/PhpStorm and Xdebug
Posted on Aug 15, 2017. Updated on Jun 12, 2022
Running PHP and an Apache in a Docker container is very handy for local development. But how can we debug the PHP code running in the container? In this post, I show you how to configure Xdebug in a PHP container and configure IntelliJ IDEA Ultimate or PhpStorm for remote debugging.
Big Picture

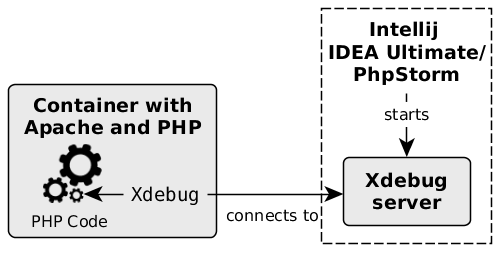
Xdebug runs within the PHP container and connects to the Xdebug server controlled by IntelliJ IDEA Ultimate/PhpStorm
Install and Configure Xdebug in the PHP Docker Container
First of all, we need to install and activate Xdebug in our PHP container. Therefore, we create an own Docker image based on the PHP/Apache image. Within the Dockerfile we install and enable Xdebug using pecl and docker-php-ext-enable. Afterward, we have to configure Xdebug with some properties in the php.ini. Take a look at the following Dockerfile:
FROM php:7.0.19-apache

RUN apt-get update &&\
    apt-get install --no-install-recommends --assume-yes --quiet ca-certificates curl git &&\
    rm -rf /var/lib/apt/lists/*

RUN pecl install xdebug-2.5.5 && docker-php-ext-enable xdebug
RUN echo 'zend_extension="/usr/local/lib/php/extensions/no-debug-non-zts-20151012/xdebug.so"' >> /usr/local/etc/php/php.ini
RUN echo 'xdebug.remote_port=9000' >> /usr/local/etc/php/php.ini
RUN echo 'xdebug.remote_enable=1' >> /usr/local/etc/php/php.ini
RUN echo 'xdebug.remote_connect_back=1' >> /usr/local/etc/php/php.ini
This leads to the following php.ini file within the container:
zend_extension="/usr/local/lib/php/extensions/no-debug-non-zts-20151012/xdebug.so"
xdebug.remote_port=9000
xdebug.remote_enable=1
xdebug.remote_connect_back=1
Port 9000 is the default port and can be skipped. Using xdebug.remote_connect_back, we don’t have to configure the IP of our development machine (where PhpStorm and the Xdebug server runs) manually. If xdebug.remote_connect_back is enabled, Xdebug automatically detects the IP of the inital HTTP request which triggers the PHP execution and connects back to this IP. More details can be found in the xdebug documentation.
To start the container, we can use the following docker-compose.yml:
version: '2'
services:
  apache_with_php:
    build: .
    volumes:
      - ./src:/var/www/html/
    ports:
      - "80:80"
Configure IntelliJ IDEA Ultimate or PhpStorm
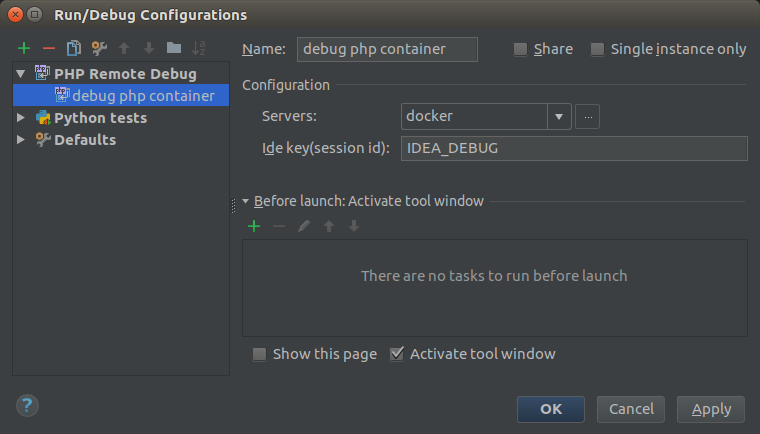
Create a Run Configuration of the type “PHP Remote Debug”. To be able to select this configuration, you may need to scroll down in the type selection popup (“Add New Configuration”) and click on “52 items more (irrelevant)” in order to find the type “PHP Remote Debug”.

Create a Debug Configuration in IntelliJ IDEA Ultimate/PhpStorm of the type ‘PHP Remote Debug’ which connects to our PHP Docker container via Xdebug
Enter an arbitrary key for Ide key(session id). I usually choose something like IDEA_DEBUG. It’s only important that you remember this key because we will use it later for the request to trigger the debugging.
Click on the three dots ... next to the Servers field to create a new server.

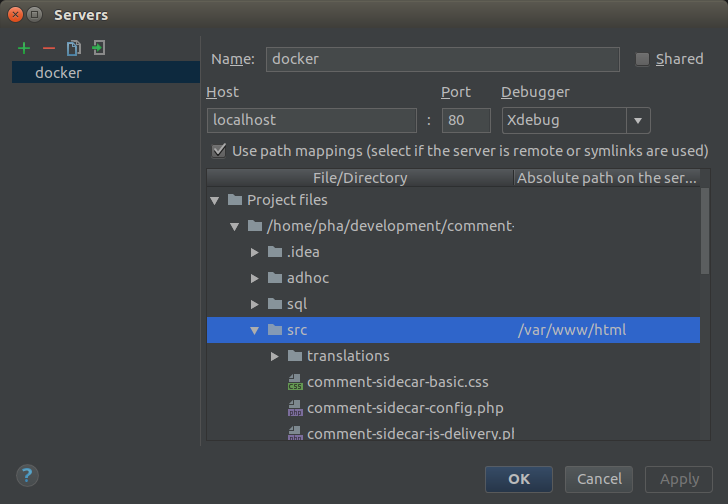
Create a Server Configuration for the PHP Docker container, configure Xdebug as the debugger and the path mapping that fits the folder structure within the PHP container
Use the following server configuration:
- Name: docker (or so)
- Host:
localhost - Port:
80 - Debugger:
Xdebug - Use path mappings:
src->/var/www/html. Hint: To submit the “absolute path on the server” press enter after typing the path in the text field. If you only click out of the field, your input will be removed.
Remote Debugging in Action!
Build and start the PHP container
docker-compose up
Start the created Debug Configuration in PhpStorm.
Create the simple PHP file hello.php in the src folder with the following content:
<?php
$world = "World";
echo "Hello" . $world; # put a breakpoint here
Add a breakpoint and make a HTTP request to the PHP file. Don’t forget to append the query parameter XDEBUG_SESSION_START=IDEA_DEBUG to the URL.
curl "http://localhost/hello.php?XDEBUG_SESSION_START=IDEA_DEBUG"
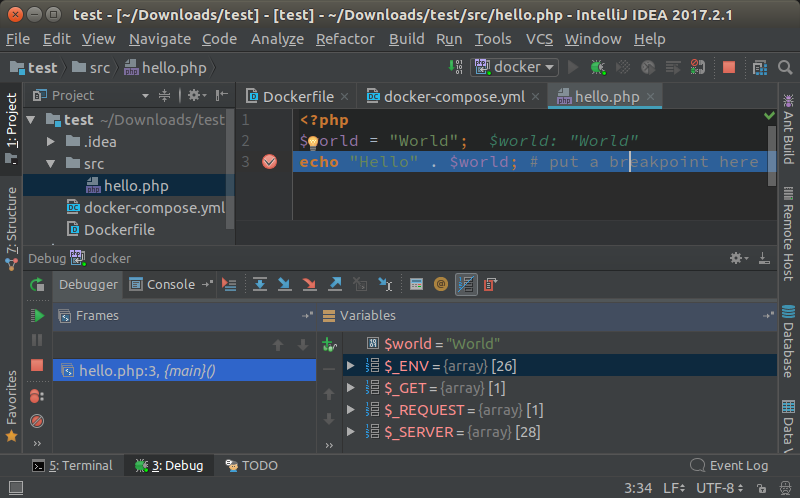
Now, PhpStorm should stop at the breakpoint and you should be able to see the value of the variable $world and step through your PHP code.

Remote Debugging of a PHP container in action
Further Information and Links
- In the above example, we triggered the debugging by passing the Xdebug key manually. But there are other means (like the Chrome extension Xdebug helper) available. Further information can be found here.
- Does xdebug work at all in the container?
- Install xdebug - just if you are curious.
- ‘Configuring xdebug in IDEA’ provides additional information about the configuration.
Real-Life Example
I used the described approach in my project comment-sidecar. Check it out for the complete source code.