Smooth Local Development with Docker-Compose, Seeding, Stubs, and Faker
Posted on May 1, 2018. Updated on Jun 23, 2018
Imagine you clone a git repo and try to start its application in your IDE. It fails. Why? The database is missing. After installing and starting a database manually you look at an empty application. There is no data in the database. Moreover, the application still doesn’t work as it requires an external service… The process of setting up a local development environment is often a journey of pain with many manual actions and implicit knowledge. How cool would it be, if we just have to call docker-compose up and the whole environment is automatically created locally containing nice dummy data?
TL;DR

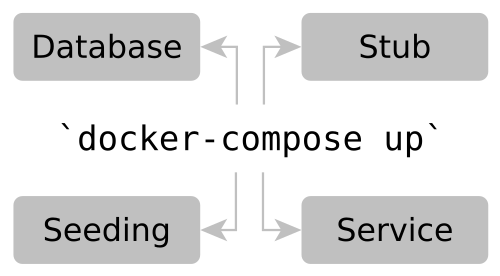
Big Picture: Starting all external dependencies of the application in Docker containers on the developer’s machine
- Independence. Starting all required external dependencies on the developer’s local machine is extremely powerful. You don’t depend on a dedicated (and maybe error-prone) infrastructure and don’t interfere with other developers.
- Getting started immediately. Using Docker and Docker-Compose, we just have to call
docker-compose upand all dependencies are available and wired correctly together. - You can start a local container for…
- … the required database.
- … seeding the database with nice and varying fake data.
- … each external service that your application requires. That can either be a handwritten stub or the actual service wrapped in a Docker container.
- Dynamically typed languages like Python are really handy to write seeding scripts or service stubs.
- Faker libraries are very convenient to generate dummy data.
- Your application or the whole system don’t have to run with Docker in production to benefit from this approach.
- Mind, that this approach is about easing local development and ad-hoc testing during development; not about automated (integration) testing.
Project Structure and Source Code
The complete source code can be found in my repository ‘smooth-local-dev-docker’ on GitHub.
We’ll create Docker images for
- seeding the database,
- stubbing a required service and
- wrapping a real service.
It’s recommended to create a folder for each Docker image. In the end, our project structure will look like this:
├── docker-compose.yml
├── local-dev
│   ├── external-service-stub
│   │   ├── Dockerfile
│   │   ├── external-service-stub.py
│   │   ├── Pipfile
│   │   ├── Pipfile.lock
│   │   └── static-user-response.json
│   ├── external-service-wrapped
│   │   ├── config.yaml
│   │   └── Dockerfile
│   ├── mongo-seeding
│   │   ├── Dockerfile
│   │   ├── Pipfile
│   │   ├── Pipfile.lock
│   │   └── seed-mongo.py
│   └── mysql-seeding
│       ├── Dockerfile
│       ├── Pipfile
│       ├── Pipfile.lock
│       └── seed-mysql.py
├── pom.xml
├── src
│   ├── ...
└── target
    ├── ...
The complete docker-compose.yml can be found here. We’ll cover the relevant parts in the following sections.
Hint: The Pipfile and Pipfile.lock declare the dependencies of the corresponding Python scripts and are installed in the Dockerfile.
Database
The Database Container
Fortunately, there are already ready-to-use Docker images for all common databases. We only have to add them to the docker-compose.yml:
version: '3'
services:
  mongo:
    image: mongo:3.4.3
    ports:
      - "27017:27017"
    command: --profile=1 --slowms=0
  mysql:
    image: mysql:5.6.33
    ports:
      - "3306:3306"
    environment:
      MYSQL_ROOT_PASSWORD: "root"
      MYSQL_DATABASE: "database"
Calling docker-compose up will start up a MongoDB and a MySQL container. Check out the documentation on DockerHub for additional configuration options via environment variables or mount points.
Seeding Container for the Database
Having an empty database is quite useless. Usually, we want to create the schema (in case of relational databases) and to insert some dummy data. The process of creating (fake) data is called seeding. Developing against a seeded database is really useful for:
- UI development. We can click through the UI of our application and see meaningful and varying data.
- (HTTP/REST) API development. We can fire some ad-hoc HTTP calls via
curl/httpie/Postman/our browser and get responses with reasonable data from our application.
So getting started with development becomes much easier. And everything is local!
But how do we seed our database?
- Some database images allow mounting scripts into the container which are executed on startup. However, this approach might be not flexible enough since it often only supports static files. Writing and maintaining them is cumbersome.
- Write a small script that generates randomized and varying data and writes it to the database. We wrap this script into an own Docker image in order to execute them automatically via docker-compose.
I love to use Python for this. But every dynamically typed language is fine. Moreover, check out the library Faker to generate nice dummy data like words, sentences, addresses, names etc. Those faker libraries exist in nearly every language.
Seed a MongoDB Docker Container
Let’s take a look at a seeding script for a MongoDB. The complete source code for seed-mongo.py can be found on GitHub.
POSSIBLE_STATES = ['ACTIVE', 'INACTIVE']
POSSIBLE_TAGS = ['vacation', 'business', 'technology', 'mobility', 'apparel']
faker = Faker('en')

class MongoSeeder:

    def __init__(self):
        host = 'mongo' if script_runs_within_container() else 'localhost'
        client = MongoClient(f'mongodb://{host}:27017/test')
        self.db = client.test

    def seed(self):
        print('Clearing collection...')
        self.db.designs.remove({})
        print('Inserting new designs...')
        designs = [generate_design() for _ in range(100)]
        self.db.designs.insert_many(designs)
        print('Done.')


def generate_design():
    data = {
        '_id': ObjectId()
        , 'name': faker.word()
        , 'description': faker.sentence(nb_words=7)
        , 'date': faker.date_time()
        , 'tags': choose_max_n_times(possibilities=POSSIBLE_TAGS, max_n=3)
        , 'state': random.choice(POSSIBLE_STATES)
        , 'designer': {
            'id': random.randint(0, 999999)
            , 'name': faker.name()
            , 'address': faker.address()
        }
    }
    if faker.boolean(chance_of_getting_true=50):
        data['superDesign'] = True
    return data

MongoSeeder().seed()
The Dockerfile:
FROM python:3.6.4-alpine3.7

RUN pip install pipenv

COPY Pipfile* /
RUN pipenv install --deploy --system

COPY seed-mongo.py /
CMD python3 /seed-mongo.py
Add the following service to the docker-compose.yml. The depends_on ensures that the seeding script/container is executed after the mongo is ready.
  mongo_seeding:
    build: ./local-dev/mongo-seeding
    depends_on:
      - mongo
The call docker-compose up will now also seed the MongoDB with nice fake data like this:
{
  "_id": ObjectId("5adc9bf7057c4b0008a4e423"),
  "name": "animal",
  "description": "Recognize measure work evening tough development firm car article.",
  "date": ISODate("2009-05-04T22:38:39Z"),
  "tags": [
    "technology"
  ],
  "state": "INACTIVE",
  "designer": {
    "id": 388948,
    "name": "Michael Mcdowell",
    "address": "5243 Kennedy Island\nAguilarshire, NE 86427"
  },
  "superDesign": true
}
Important Hint: After changing the seeding script, use docker-compose up --build to re-create the image with the seeding script. Otherwise, your change will have no effect.
Seed a MySQL Docker Container
The approach is analogous for every database. The complete seeding script seed-mysql.py can be found on GitHub. Here are the essentials:
POSSIBLE_STATES = ['ACTIVE', 'INACTIVE']
faker = Faker('en')

class MySqlSeeder:

    def __init__(self):
        config = {
            'user': 'root',
            'password': 'root',
            'host': 'mysql' if script_runs_within_container() else 'localhost',
            'port': '3306',
            'database': 'database'
        }
        # leaving out the retry loop for the sake of simplicity
        self.connection = mysql.connector.connect(**config)
        self.cursor = self.connection.cursor()

    def seed(self):
        print("Clearing old data...")
        self.drop_user_table()
        print("Start seeding...")
        self.create_user_table()
        self.insert_users()

        self.connection.commit()
        self.cursor.close()
        self.connection.close()
        print("Done")

    def create_user_table(self):
        sql = '''
        CREATE TABLE users(
          id INT PRIMARY KEY AUTO_INCREMENT,
          name VARCHAR(50),
          state VARCHAR(50),
          birthday TIMESTAMP,
          notes VARCHAR(150),
          is_adult TINYINT(1)
        );
        '''
        self.cursor.execute(sql)

    def insert_users(self):
        for _ in range(300):
            sql = '''
            INSERT INTO users (name, state, birthday, notes, is_adult)
            VALUES (%(name)s, %(state)s, %(birthday)s, %(notes)s, %(is_adult)s);
            '''
            user_data = {
                'name': faker.name(),
                'state': random.choice(POSSIBLE_STATES),
                'birthday': faker.date_time(),
                'notes': faker.sentence(nb_words=5),
                'is_adult': faker.boolean(chance_of_getting_true=80)
            }
            self.cursor.execute(sql, user_data)

    def drop_user_table(self):
        self.cursor.execute('DROP TABLE IF EXISTS users;')

MySqlSeeder().seed()
Dockerfile:
FROM python:3.6.4-alpine3.7

RUN pip install pipenv

COPY Pipfile* /
RUN pipenv install --deploy --system

COPY seed-mysql.py /
CMD python3 /seed-mysql.py
docker-compose.yml:
  mysql_seeding:
    build: ./local-dev/mysql-seeding
    depends_on:
      - mysql
Calling docker-compose up --build leads to a table with nice dummy entries:
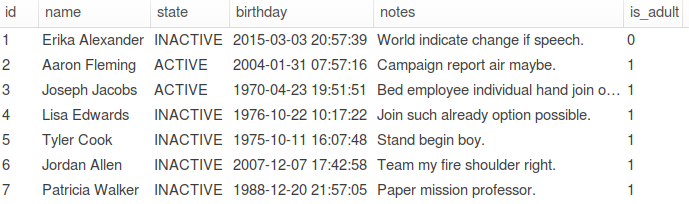
Our seeded MySQL with nice randomized fake data
External Services
Handwritten Service-Stub
One option to handle external services of our application is to write a stub that implements the same HTTP API but returns fake data. Again, Python and the web framework Flask in combination with Faker is really useful to write stubs with only a few lines of code. Click here for the complete source code of external-service-stub.py
app = Flask(__name__)
faker = Faker('en')

# A: Generate the payload with faker
@app.route('/users', methods=['GET'])
def get_users_faker():
    response_users = [generate_user(user_id) for user_id in range(50)]
    payload = {
        'users': response_users,
        'size': len(response_users)
    }
    return Response(json.dumps(payload), mimetype='application/json')

def generate_user(user_id):
    return {
        'id': user_id,
        'email': faker.email(),
        'name': faker.name(),
        'address': faker.address(),
        'company': faker.company(),
        'keyAccountInfo': faker.sentence(nb_words=6) if faker.boolean(chance_of_getting_true=50) else None
    }

# B: Return a static payload
@app.route('/users2', methods=['GET'])
def get_users_static():
    with open('static-user-response.json', 'r') as payload_file:
        return Response(payload_file.read(), mimetype='application/json')

app.run(debug=False, port=5000, host='0.0.0.0')
Dockerfile:
FROM python:3.6.4-alpine3.7

RUN pip install pipenv

COPY Pipfile* /
RUN pipenv install --deploy --system

COPY external-service-stub.py /
COPY static-user-response.json /static-user-response.json
CMD python3 /external-service-stub.py
docker-compose.yaml:
  external_service_stub:
    build: ./local-dev/external-service-stub
    ports:
      - "5000:5000"
After calling docker-compose up --build we can request the started service stub using curl http://localhost:5000/users. Response:
{
    "size": 50,
    "users": [
        {
            "address": "342 Louis Light Apt. 213\nNew Annette, OK 87681-3166",
            "company": "Thomas, Garcia and White",
            "email": "butlerderek@hotmail.com",
            "id": 0,
            "keyAccountInfo": "Report public answer throughout likely.",
            "name": "Kenneth Brown"
        },
        {
            "address": "PSC 6024, Box 6781\nAPO AP 75794",
            "company": "Bell Inc",
            "email": "floressara@hotmail.com",
            "id": 1,
            "keyAccountInfo": null,
            "name": "Dennis Ho"
        }
    ]
}
Use the Actual Service
The stubbing approach works pretty well if we only consume a couple of resources and if there is no sophisticated interaction and state between our application and the external service. If things are getting more complicated, you may end up re-writing the external service. In this case, it’s better to use the real service.
- Pro: No need to write a stub. Using the real service makes your setup more realistic.
- Cons: You need to provide every dependency that is required by the external service. This, in turn, can be databases (which has to be seeded) and other services. This might end up in a huge effort and is not justified in every case.
But let’s take a look at the implementation. The good news is, that the external service doesn’t have to be dockerized in the first place. Wrapping it manually is easy. Just curl the jar from our internal Maven Repository (like Nexus or Artifactory).
Dockerfile:
FROM openjdk:8u151-jre-alpine3.7

RUN apk add --no-cache curl

# default build argument. overwritten in docker-compose.yml
ARG SERVICE_VERSION=2.13.13
RUN curl --user nexusUser:nexusPassword --output external-service.jar https://my-nexus-repo.com/repository/maven-public/de/philipphauer/blog/external-service/$SERVICE_VERSION/external-service-$SERVICE_VERSION.jar

COPY config.yaml /
CMD java -jar external-service.jar --spring.config.location config.yaml
The config.yml contains configurations like the coordinates of the database for the external service. Its database will also be started by docker-compose.
server:
  port: 8080
  data:
    mongodb:
      # the host is the service name in the docker-compose.yml.
      uri: "mongodb://user:password@external_service_mongo:27018/test"
docker-compose.yml:
  external_service_mongo:
    image: mongo:3.4.3
    ports:
      - "27018:27017"
    command: --profile=1 --slowms=0
  external_service_wrapped:
    build:
      context: local-dev/external-service-wrapped/
      args:
        SERVICE_VERSION: 2.14.14
    ports:
      - "8080:8080"
    depends_on:
      - external_service_mongo
Advantages
Local Development
- Faster getting started
- Independent development
- Independent from dedicated (flaky?) infrastructure
- Don’t interfere with other devs
- No need to be online at all or connected to the company network
Docker
- Light-weight. Docker is an approach for light-weight virtualization and comes with a small overhead and footprint. It’s no problem to start multiple Docker container at the same time on a single machine.
- No pollution. We don’t have to install the databases and services directly on the developer’s machine. After stopping the containers, no remainings are left on the filesystem.
- Automation. Docker-Compose allows automating the creation of the whole development environment. We only have to call
docker-compose up.
Handwritten Seeding Scripts and Stubs
- Full control over data and responses.
- It’s easy to reproduce certain scenarios locally (like null values or broken data).
Tips
- Learning Python is easy, great fun and worthwhile for every Java Developer. I recommend the book Python for the Busy Java Developer
.
- Let the seeding scripts reflect the variety of data in the production database. If a certain field can be null, also return null in 25% of the cases (using
faker.boolean(chance_of_getting_true=25)). - Mind to use
docker-compose up --buildafter changes in the stubs and seeding scripts. So the Docker image with the updated scripts is rebuilt. Otherwise, the changes don’t take effect. - Speed up the re-creation of the Docker images by putting the lines that change rarely to the top (
RUN pip install pipenv) and the one that changes more frequently (COPY external-service-stub.py /) to the bottom. This way, only the last layer of the image needs to be recreated after the script has been changed. This also enables the reuse of certain layers across all Docker images (e.g. every Docker image starts withRUN pip install pipenv).