Don't Put Fat Jars in Docker Images
Posted on Oct 14, 2019. Updated on Jun 12, 2022
Putting a fat jar into a Docker container is a waste of storage, bandwidth and time. Fortunately, we can leverage Docker’s image layering and registry caching to create incremental builds and very small artifacts. For instance, we could reduce the effective size of new artifacts from 75 MB to only one MB! And the best is that there is a plugin for Maven and Gradle handling everything for us.
TL;DR
- A fat jar contains all dependencies that usually don’t change between releases. But those dependencies are copied again and again into each fat jar leading to a waste of space, bandwidth and time.
- For instance, the fat jar of our Spring Boot application was 72 MB big but contained only 2 MB code. Usually, the code is the only part that has been changed.
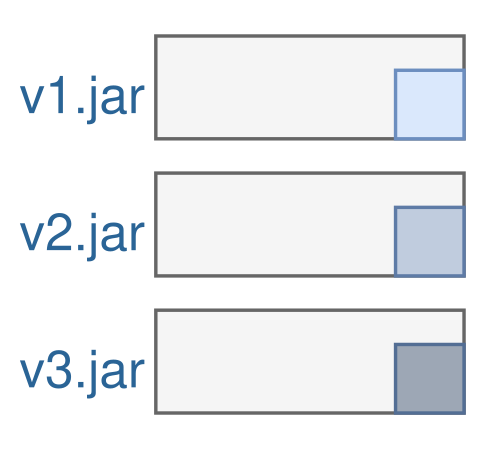
- Fortunately, we can leverage Docker’s image layering: By putting the dependencies and resources in different layers, we can reuse them and only update the code for each artifact/release.
- Jib provides an easy-to-use plugin for Maven and Gradle to implement this approach. No need to write a Dockerfile manually.
The Problem: The Dependencies in the Fat Jar
The layer mechanism of Docker is powerful. If all of your applications are using the same base image (like openjdk:11.0.4-jre-slim) Docker reuses the layers of the OS and the JRE. So we save storage in the Docker registry and speed up the upload to and download from the registry because fewer MBs have to be transferred (Docker only transfers the layers that are new to the registry).
Unfortunately, many applications don’t fully leverage this powerful mechanism because they are using fat jars within a Docker container.

Each new release creates a new Docker layer with 72 MB
Let’s assume our Spring Boot application is packaged into a fat jar. This fat jar is 72 MB big and is added in the last line of the Dockerfile. This means that each new release will take 72 MB storage and 72 MB have to be uploaded to and downloaded from the registry.
Now, it’s important to take a closer look at these 72 MB:

Content of a fat jar. The majority of its content changes rarely but it’s copied over and over again into each artifact.
A fat jar contains three parts:
- The dependencies: The used libraries are taking most of the size but they change rarely. Most of the time when we create a release, we only touched our code and not the dependencies. Still, the dependencies are copied into each release.
- The resources: Basically, it’s the same problem here. Although the resources (HTML, CSS, images, configuration files, etc) change more often than the dependencies, they still don’t change as often as the code changes. But they are also duplicated in each release.
- The code: The code has only a small share of the total size of the fat jar (300 KB - 2 MB) but is the most frequently changed part of it.
So the code that is usually changed for a new release is only a few MB. Still, we copy all the dependencies and resources again and again in each artifact. That’s a waste of space, bandwidth and time.
Moreover, the space wasting is getting even worse when you are creating a unique, deployable artifact for each commit (using the git commit hash as the version number of the artifact). That makes sense for continuous delivery but leads to a high storage consumption as every commit occupies additional 72 MB.
What are useful tools for analyzing docker images and visualizing the impact of fat jars in docker images? It’s dive and docker history.
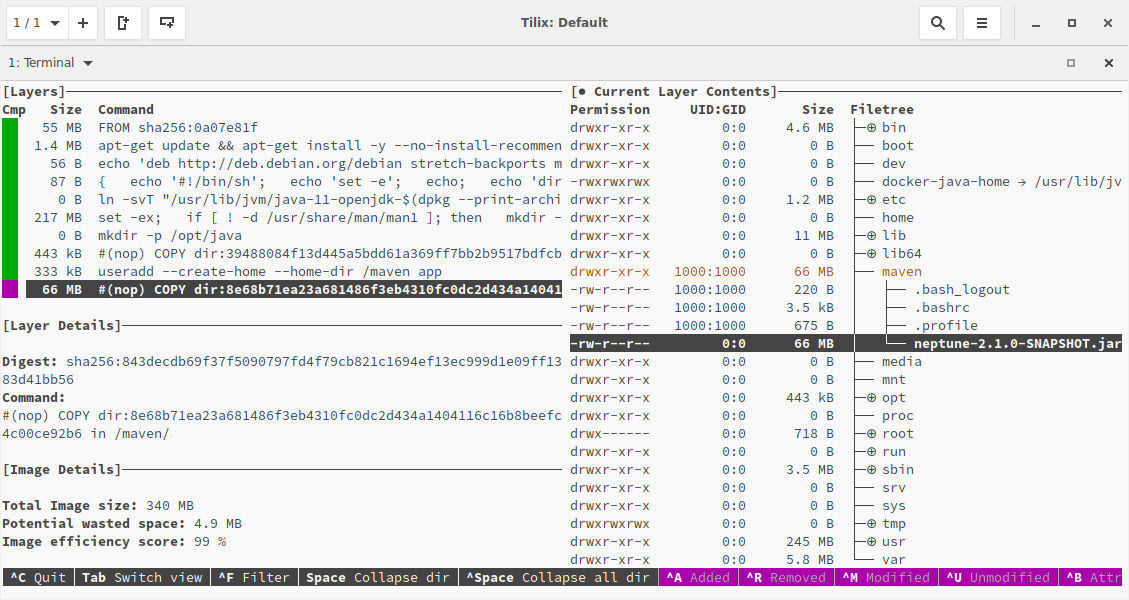
The interactive command-line tool dive shows the fat jar layer.
docker history also reveals the fat jar layer:
~ ❯❯❯ docker history registry.domain.com/neptune:latest
IMAGE           CREATED          CREATED BY                     SIZE
44e77fa110e5    2 minutes ago    /bin/sh -c #(nop) COPY dir:…   65.5MB
...
<missing>       8 months ago     /bin/sh -c set -ex;   if [ …   217MB
...
<missing>       8 months ago     /bin/sh -c #(nop) ADD file:…   55.3MB
The Solution: Different Layers for Dependencies, Resources, and Code
Fortunately, we can take advantage of Docker’s layering mechanism; just like we already do for the OS and the JRE layer. We extend this approach by introducing different layers for the dependencies, the resources, and the code. And we order the layers by the frequency of change.

Splitting up the application with three different Docker layers for the dependencies, resources, and code. A usually release will now only take 2 MB instead of 72 MB.
Now, if we create a release that only consists of code changes, we only require 2 MB of storage because the layers for the resources and dependencies can be reused. They already exist in the registry and don’t have to be transferred to it again.
Implementation with Google’s Jib Plugin
Good news: We don’t have to manually write Dockerfiles for our Java applications. We can use Google’s Jib. Jib is available as a plugin for Maven and Gradle and it simplifies the containerization of Java applications. A nice pitch for Jib can be found in the Google Blog, but one characteristic is most important for us: Jib scans our Java project and creates different layers for the dependencies, resources and the code. It’s great how Jib works out of the box.
What are the steps?
- Add the plugin configuration to our pom.xml:
<plugin>
    <groupId>com.google.cloud.tools</groupId>
    <artifactId>jib-maven-plugin</artifactId>
    <version>1.6.1</version>
    <configuration>
        <from>
            <image>openjdk:11.0.4-jre-slim</image>
        </from>
        <to>
            <image>domain.com/${project.artifactId}:latest</image>
            <!-- optional: create a tag based on the git commit id (via the git-commit-id plugin): -->
            <tags>
                <tag>${git.commit.id}</tag>
            </tags>
        </to>
        <container>
            <jvmFlags>
                <jvmFlag>-server</jvmFlag>
            </jvmFlags>
        </container>
    </configuration>
    <executions>
        <execution>
            <id>build-and-push-docker-image</id>
            <phase>package</phase>
            <goals>
                <goal>build</goal>
            </goals>
        </execution>
    </executions>
</plugin>
- Usage
# execute the whole build lifecycle and push the image to the registry
mvn package

# only create and push the image.
mvn jib:build
# Note that `jib:build` is daemonless and won't create the image on your machine.
# It talks directly to the registry. Use `docker pull` to fetch the created image.

# only create and push the image via the Docker daemon.
mvn jib:dockerBuild
- Profit. Dive and
docker historyshows the new shiny layer structure.
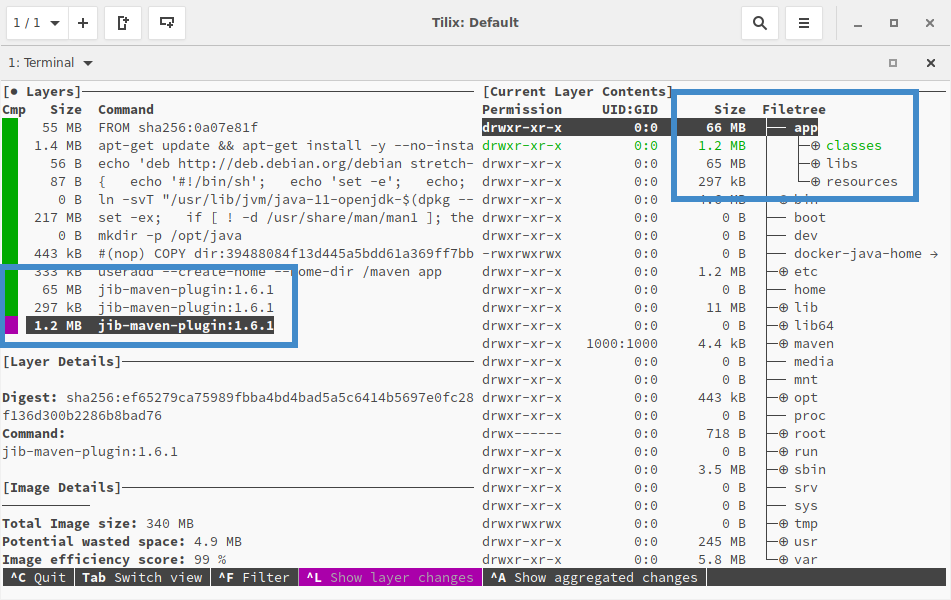
The three different layers for the dependencies, resources, and code in our built docker image with Jib
~ ❯❯❯ docker history registry.domain.com/neptune:latest
IMAGE          CREATED         CREATED BY                SIZE     COMMENT
a759771eb008   49 years ago    jib-maven-plugin:1.6.1    1.22MB   classes
<missing>      49 years ago    jib-maven-plugin:1.6.1    297kB    resources
<missing>      49 years ago    jib-maven-plugin:1.6.1    64.6MB   dependencies
...
<missing>      8 months ago    /bin/sh -c set -ex; ...   217MB
...
<missing>      8 months ago    /bin/sh -c #(nop) ADD...  55.3MB
Optional Clean-Up
Clean-up 1) Disable the maven-deploy-plugin, the maven-install-plugin, and the maven-jar-plugin. These steps are not required anymore and should not be executed even if the developer types mvn deploy out of habit.
<plugin>
    <groupId>org.apache.maven.plugins</groupId>
    <artifactId>maven-deploy-plugin</artifactId>
    <configuration>
        <skip>true</skip>
    </configuration>
</plugin>
<plugin>
    <groupId>org.apache.maven.plugins</groupId>
    <artifactId>maven-install-plugin</artifactId>
    <configuration>
        <skip>true</skip>
    </configuration>
</plugin>
<plugin>
    <groupId>org.apache.maven.plugins</groupId>
    <artifactId>maven-jar-plugin</artifactId>
    <!-- Unfortunately, the skip flag is not supported.
    Workaround: Bind the default-jar execution to a nonexistent phase. -->
    <executions>
        <execution>
            <id>default-jar</id>
            <phase>none</phase>
        </execution>
    </executions>
</plugin>
Clean-up 2) Remove the spring-boot-maven-plugin if you are using Spring Boot. There is no need to create a fat jar anymore.
Run a Deployment-Specific Configuration
Jib allows configuring the JVM flags and program arguments in the pom.xml. But usually, we don’t want to set those things at the build time. Instead, the configuration depends on the deployment environment (local, QA, production). This is where we want to set the Spring configuration and the JVM Heap size.
- JVM Flags: We use the environment variable JAVA_TOOL_OPTIONS to add JVM flags like the heap size.
- Spring configuration: We mount the deployment-specific external configuration file into the Docker container and pass the location as a program argument. Alternatively, you can also use environment variables for this.
docker run -p 1309:1309 --net=host \
    -e JAVA_TOOL_OPTIONS='-Xms1000M -Xmx1000M' \
    -v /home/phauer/dev/app/app-config.yml:/app-config.yml \
    registry.domain.com/app:latest \
    --spring.config.additional-location=/app-config.yml